How to Use Own Narration on Golpo AI: Upload Audio, Video, or Record Live
Golpo AI's Own Narration toggle lets you use your own voice, your own audio files, or your own video recordings to create polished explainer videos. Upload an MP3 from ElevenLabs, repurpose a Zoom recording, or record directly from your microphone or webcam — and Golpo turns it into a professional whiteboard-style video. Here is exactly how to do it.

Picture in Picture with Own Narration
Recording with your webcam or uploading a video of somebody speaking? Golpo can keep the presenter visible in a round corner overlay or a split-screen layout on the left, right, top, or bottom. See the complete Picture-in-Picture guide and seven examples →
Golpo AI generates narration for your videos automatically — but sometimes you want your own voice, your own recording, or audio you have already produced. Maybe you recorded a voiceover using ElevenLabs. Maybe you have a Zoom recording of a presentation you want turned into a polished explainer. Maybe you just want to talk into your microphone and let Golpo handle the visuals.
The Own Narration toggle makes all of this possible. When you turn it on, Golpo stops generating narration and instead uses whatever audio you provide — then builds the video around it. The AI listens to your audio and generates visuals that match what you are saying.
This guide walks through every way to use Own Narration, with real examples of what the output looks like.
Where to Find the Own Narration Toggle
When you open the Golpo AI video creation page, you will see the default view with a text prompt area where you describe your video topic. In the top-right area, there are two toggles: Own Narration and Script Mode.
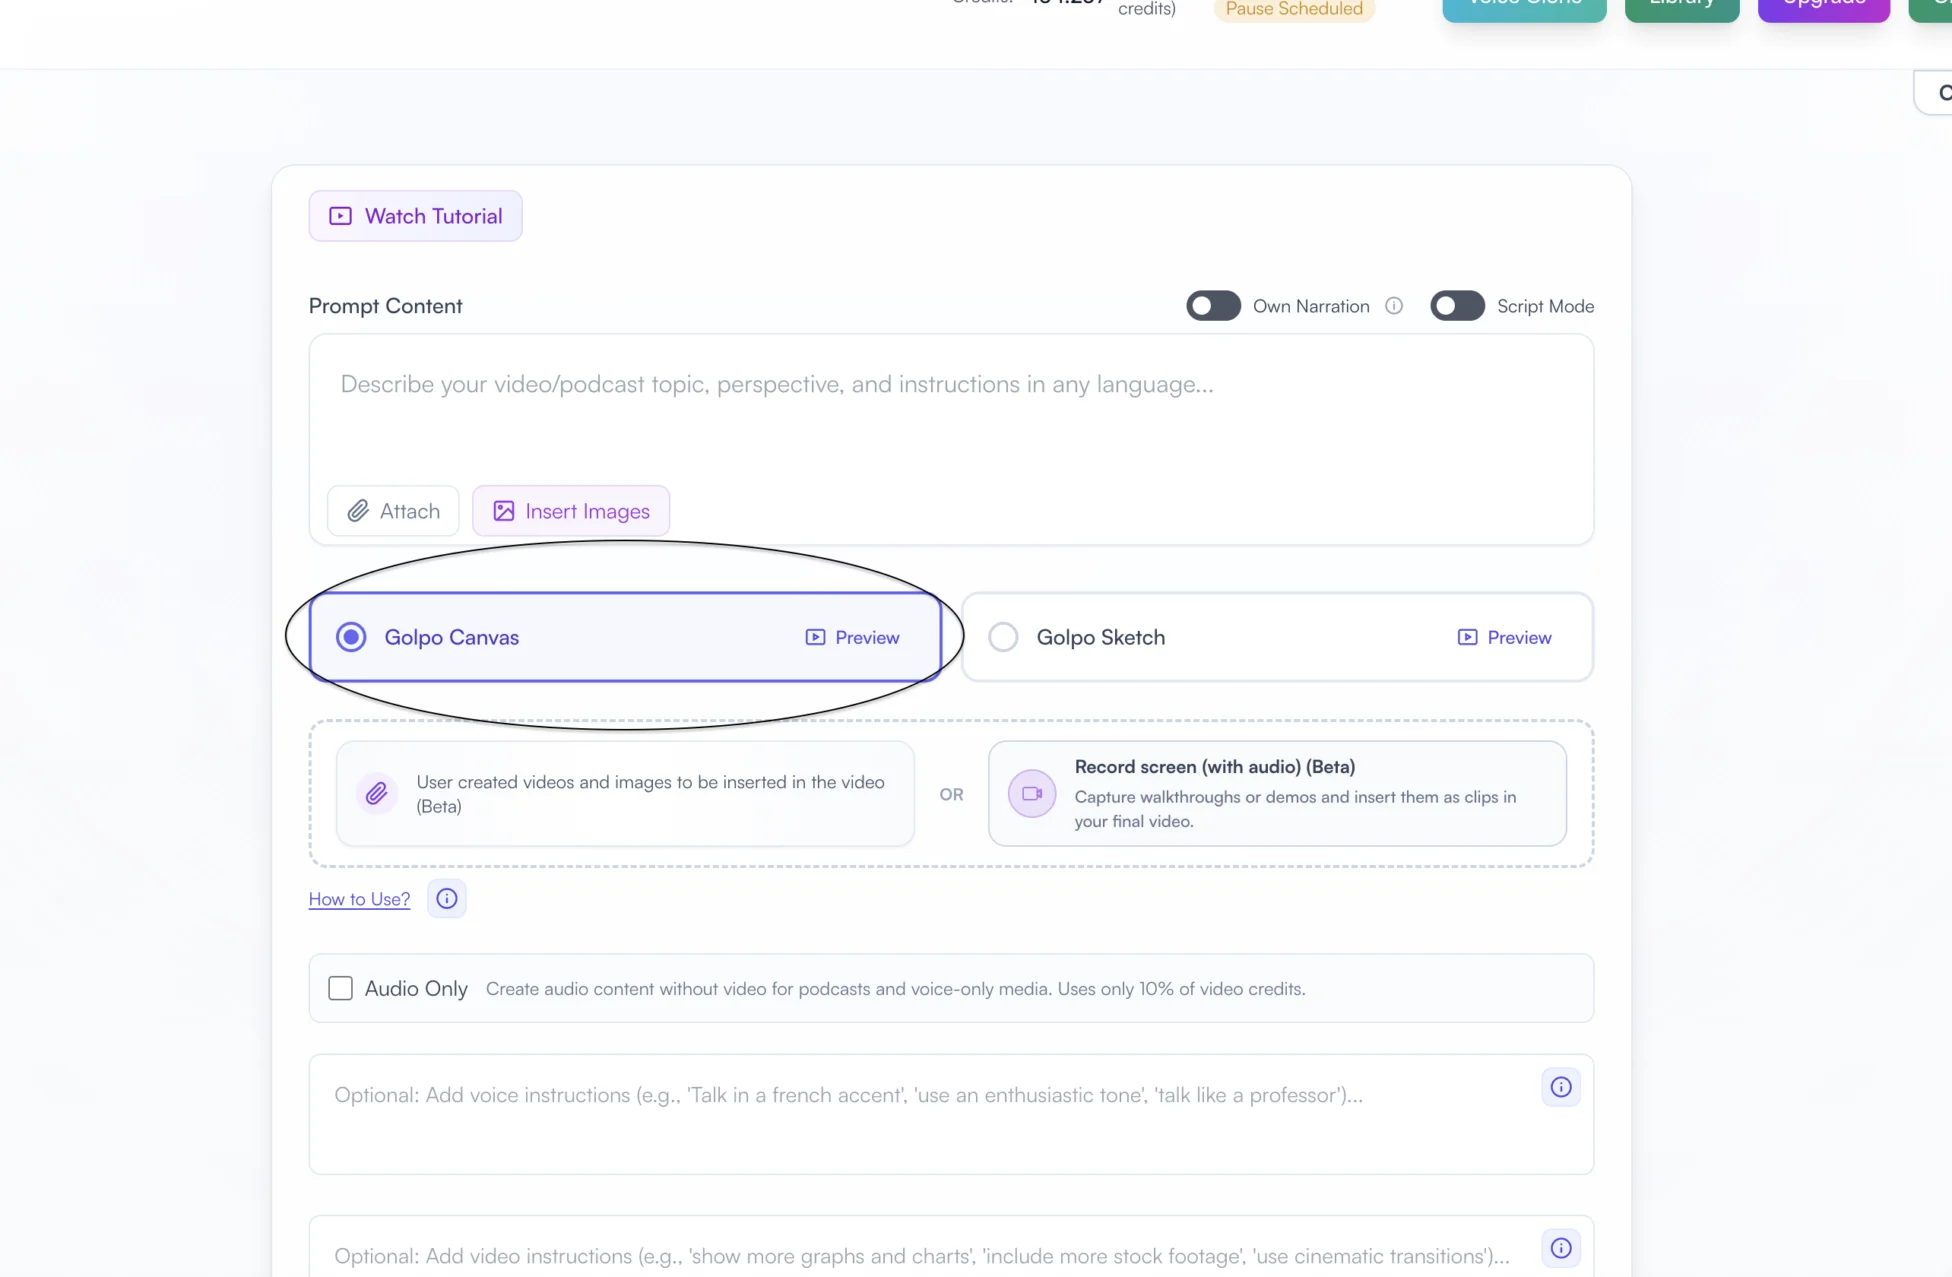
By default, Own Narration is turned off. In this mode, you write a prompt, Golpo generates a script and narration for you, and then produces the video. This is the standard workflow.
When you flip the Own Narration toggle to ON, the interface changes completely. The text prompt area disappears and is replaced with audio and video input options.
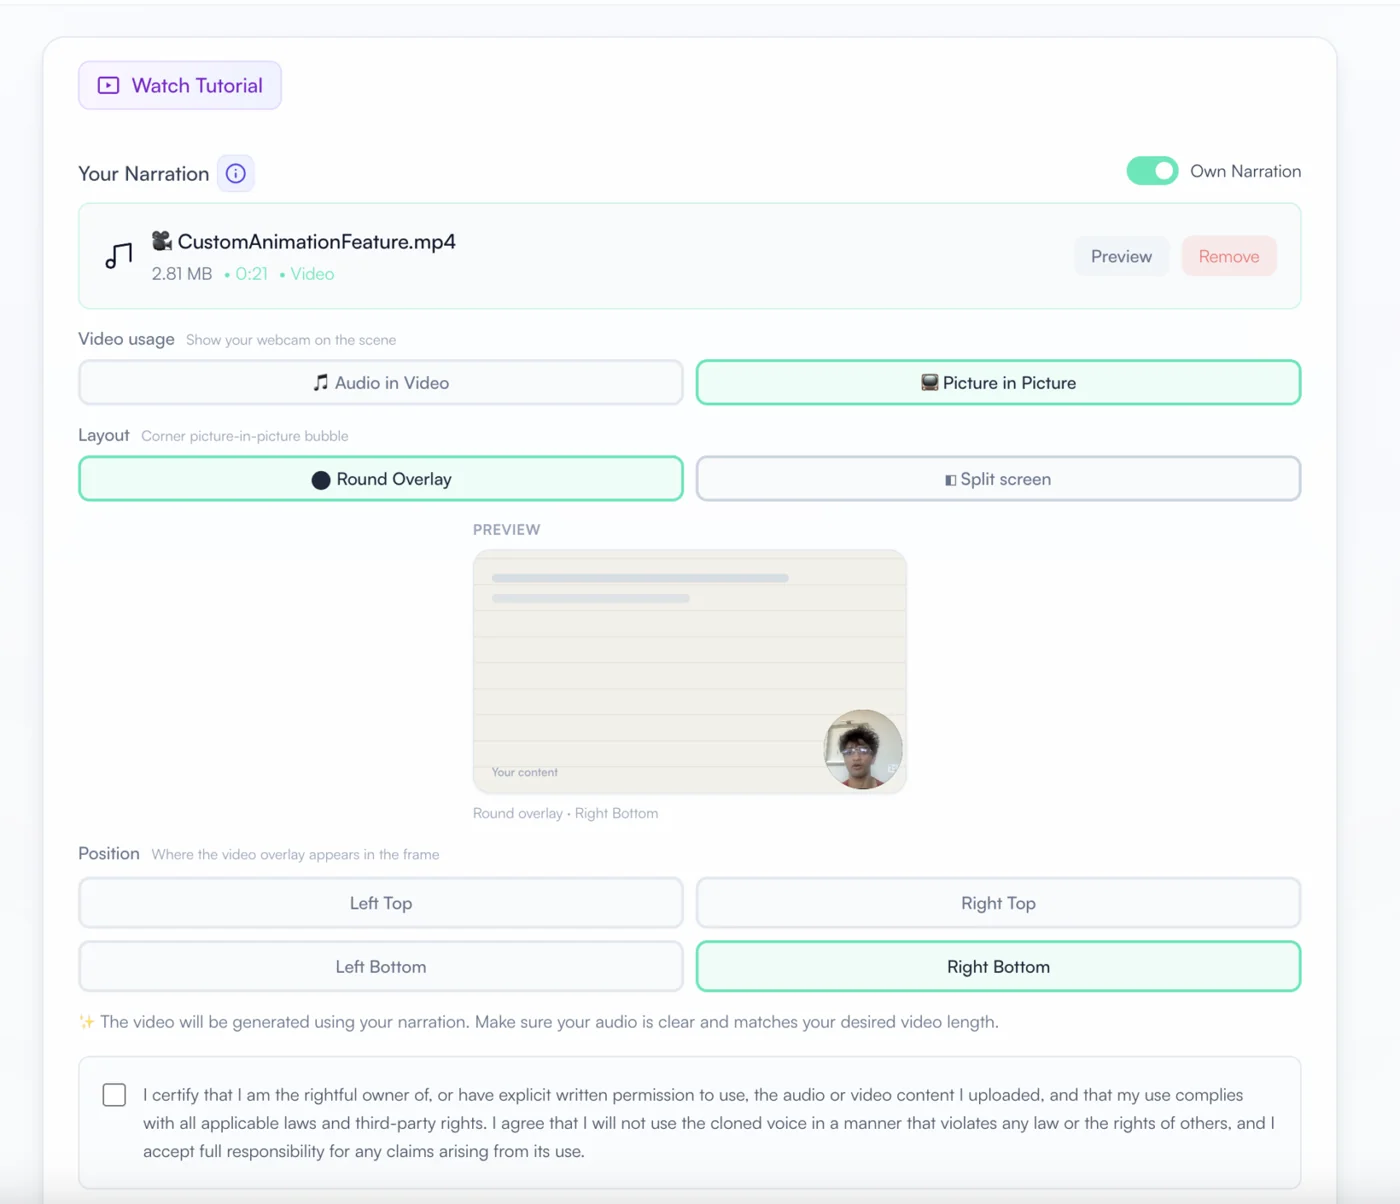
The interface provides three input controls that cover four common workflows:
- Upload Audio or Video — upload an existing audio file or an existing video file
- Record Audio — use your microphone to record narration directly in the browser
- Record Webcam — capture a new camera-and-audio recording in the browser
Let us go through each one.
Option 1: Upload Your Own Audio File
This is the most common use case. You already have an audio file — maybe you recorded a voiceover, generated speech using a tool like ElevenLabs or other text-to-speech services, or extracted audio from a podcast or presentation.
Here is how it works:
- Toggle Own Narration to ON
- Click the upload area or drag your audio file into it
- Golpo accepts MP3, WAV, M4A, and other common audio formats
- Select your video style — Golpo Canvas or Golpo Sketch
- Optionally add video instructions (for example, "show more graphs and charts" or "use cinematic transitions")
- Hit generate
Golpo transcribes your audio, understands the content, and generates visuals that match your narration. Golpo uses the supplied audio as the narration instead of generating an AI voice.
This video walks through the process of uploading your own audio to Golpo AI:
And here is another walkthrough showing the same upload workflow:
Real Example: Alexander the Great Explainer
To show what the output looks like, we uploaded an audio narration about Alexander the Great. The audio was a straightforward voiceover explaining his conquests and legacy. Golpo took that audio and generated a complete whiteboard-style explainer video with matching illustrations, maps, and animated scenes — all synced to the narration.
Here is the result:
Notice how the visuals are not generic stock footage. Golpo understood the audio content and created relevant illustrations — battle scenes, maps of the empire, portraits — all in the Golpo Sketch style. This is the power of using your own narration: you control exactly what is said, and Golpo handles making it visually compelling.
When to Use Audio Upload
- AI-generated voiceovers — use ElevenLabs, Amazon Polly, Google Cloud TTS, or any text-to-speech tool to create a polished voiceover in any voice or language, then upload it to Golpo
- Podcast repurposing — take a segment from your podcast and turn it into a visual explainer your audience can share
- Multilingual content — record narration in any language and Golpo generates visuals to match
- Consistent brand voice — if your company has a specific narrator or voice talent, use their recordings across all your videos
Option 2: Upload an Existing Video
The upload area accepts common video formats too, including MP4 and MOV. After uploading a video, choose how Golpo should use it:
- Audio in Video — Golpo uses the video's audio track as narration and generates new visuals around it. The source video's picture is not shown.
- Picture in Picture — Golpo keeps the speaker visible alongside the generated content. Choose a round corner overlay or a split-screen layout. See the complete Picture-in-Picture guide for layouts and examples.
The uploaded video's picture is removed only when you select Audio in Video. If you select Picture in Picture, Golpo preserves the presenter video and displays it in your chosen overlay or split-screen layout.
This is incredibly useful for repurposing content you already have:
- Zoom recordings — turn a presentation or training session into a polished explainer, with or without the speaker visible
- Old marketing videos — retain useful narration while generating an updated visual treatment
- Conference talks — turn an executive keynote into a shareable animated explainer
- Internal training recordings — combine a presenter with generated teaching visuals
Toggle Own Narration on, upload the video, choose Audio in Video or Picture in Picture, configure the visual settings, certify that you have the right to use the recording, and generate the video.
Option 3: Record Audio Directly
If you do not have a pre-recorded file, you can record your narration directly in Golpo using the Record Audio button. This uses your computer or phone's microphone.
Click Record Audio, speak your narration, stop the recording, and Golpo uses it immediately. No need to save a file, transfer it to your computer, or deal with audio editing software.
This is perfect for:
- Quick explainers where you just want to talk through a topic naturally
- Internal videos where production polish on the audio is not critical
- Iterating fast — record, generate, review, re-record if needed
Option 4: Record With Your Webcam
The Record Webcam option captures both your camera feed and audio. Choose Picture in Picture if you want the recording to remain visible beside the Golpo-generated visuals. Choose Audio in Video if you want Golpo to use only the recording's audio.
This video demonstrates how to use the webcam recording and microphone recording features to create a whiteboard-style explainer video:
Webcam recording is great for:
- Personal branding — coaches, educators, and consultants who want their face in the video to build trust
- Course creators — record yourself explaining a concept and let Golpo add animated illustrations
- Sales outreach — record a personalized message to a prospect with your face visible, enhanced by Golpo's visual storytelling
Settings You Can Customize
After providing your narration through any of the four methods, you still have control over several settings that affect the final video:
- Animation engine — choose Golpo Canvas or Golpo Sketch and use the available Preview links to compare them
- Music — add background music or keep it at None to let your narration stand alone
- Orientation — choose Horizontal or Vertical when that option is available for your selected configuration
- Style and pacing — select from the visual styles and pacing options available for your chosen engine and plan
- Video instructions — direct the visual treatment with requests such as “show more graphs and charts”
- Video usage and layout — for a video source, choose Audio in Video or Picture in Picture; Picture in Picture adds overlay or split-screen controls
Important: In Own Narration mode, the uploaded or recorded narration determines the video duration, so the normal duration selector is disabled. The recording also supplies the spoken language; changing a language setting does not translate the supplied audio. AI voice selection and Voice Instructions do not apply because Golpo is using your narration.
Before generation, you must certify that you own the uploaded audio or video, or have explicit permission to use it, and that your use complies with applicable laws and third-party rights.
Own Narration vs. Default AI Narration: When to Use Which
Golpo's built-in AI narration is excellent for most use cases. You write a prompt, and it generates a complete video with script and voiceover. Use Own Narration when:
- You need a specific voice — your own, your CEO's, or a branded AI voice from ElevenLabs
- You already have content recorded — a Zoom call, a podcast segment, a conference talk
- You want precise control over what is said — writing a prompt gives you approximate control, but recording your own audio gives you exact control over every word
- You are repurposing existing video — the narration is good, but you want fresh, professional visuals
- You want your face in the video — webcam recording is only available through Own Narration
For everything else — when you want to describe a topic and let Golpo handle both the script and the visuals — the default prompt-based workflow is faster and requires less preparation.
Getting Started
Go to video.golpoai.com, open the video creation page, and turn on Own Narration. Upload an audio or video file, or record with your microphone or webcam. Then choose your visual settings, confirm you have the required rights to the recording, and generate the video.
Related feature guides
- Picture in Picture in Golpo — keep the webcam or uploaded presenter video visible in a round overlay or split-screen layout.
- Voice Instructions in Golpo — direct an AI voice's accent, tone, pacing, and pronunciation.
- Video Instructions in Golpo — control the visual treatment generated around your narration.
- Golpo pricing breakdown — compare Own Narration and related feature availability by plan.
Whether you are a teacher recording lessons, a marketer repurposing webinar recordings, a sales rep personalizing outreach, or a content creator building a YouTube channel — Own Narration puts you in control of the voice while Golpo handles everything else.


