How to Create Picture-in-Picture Animations in Golpo: Webcam, Split Screen, and Round Overlays
Keep the presenter on screen while Golpo builds an animated explainer around their narration. See seven real examples, then learn how to record a webcam video or upload a speaking video and place it in a round overlay or split-screen layout.

Sometimes the person delivering the message is part of the message.
Picture in Picture lets you keep a real presenter visible while Golpo creates the animated explanation around their narration. Record with your webcam inside Golpo or upload an existing video of somebody speaking, then place that presenter in a corner bubble, beside the animation, above it, or below it.
The result combines the credibility and personality of a face-to-camera recording with the clarity of a visual explainer.
In this guide: See seven real examples · Create a Picture-in-Picture video · Choose a layout · Explore use cases · Improve the result
Seven real Picture-in-Picture examples
These are finished Golpo videos, not interface mockups. Each player below embeds the corresponding MP4 from Golpo's S3 storage.
1. Presenter on the right
A right-side split keeps the speaker visually anchored while the animated content develops on the left.
2. Round overlay in the top-right corner
The round overlay keeps the presenter present without taking much space away from the animated explanation. It works especially well for tutorials, reactions, introductions, and personal messages.
3. Presenter above the animation
A top placement gives the speaker a strong opening presence and leaves the lower area available for diagrams, drawings, and supporting scenes.
4. Presenter below the animation
A bottom placement gives the visual explanation the largest area at the top while keeping the narrator continuously visible underneath.
5. Presenter on the left at 35%
The wider left panel gives the speaker more visual weight—useful when facial expression and direct address matter as much as the explainer.
6. Presenter on the left at 30%
A slightly narrower presenter panel returns more space to the animation while preserving the connection of a face-to-camera delivery.
7. Presenter on the right at 35%
This version mirrors the wider split, placing the visual explanation on the left and the presenter on the right.
What is Picture in Picture in Golpo?
Picture in Picture is an Own Narration feature that uses a video recording for two jobs at once:
Plan availability: Own Narration, including Picture in Picture, is available on the Business plan and all higher tiers. See the full Golpo pricing breakdown for the current plan comparison.
- The recording's audio becomes the narration that drives the timing of the Golpo animation.
- The recording's camera footage remains visible as the presenter layer.
Golpo removes the uploaded video's picture only when you select Audio in Video. That choice uses the recording's audio track as narration while Golpo generates new visuals. When you select Picture in Picture, Golpo preserves the presenter video and displays it in your chosen overlay or split-screen layout.
You can supply the presenter in either of two ways:
- Record Webcam: record camera and microphone live without leaving Golpo.
- Upload Audio or Video: upload an existing video of yourself or another authorized speaker.
How to create a Picture-in-Picture video
Step 1: Turn on Own Narration
Open the video creation screen and switch on the Own Narration toggle at the top. This changes the workflow from an AI-selected voice to narration supplied by you.
Step 2: Record with your webcam or upload a speaking video
Choose Record Webcam to capture camera and audio live. Golpo shows a countdown, recording timer, and stop control. If the recording already exists, choose the upload option and add the video file instead.
Use clear speech and keep the recording close to the desired final video length. Golpo synchronizes the animation to this narration.
Step 3: Choose Picture in Picture
Once the video is attached, find Video usage and select Picture in Picture. Do not leave Audio in Video selected if you want the speaker to remain visible.
Step 4: Choose Round Overlay or Split screen
Select Round Overlay for a compact circular presenter bubble. Then choose the corner: Left Top, Right Top, Left Bottom, or Right Bottom. The preview shows the placement before you generate.
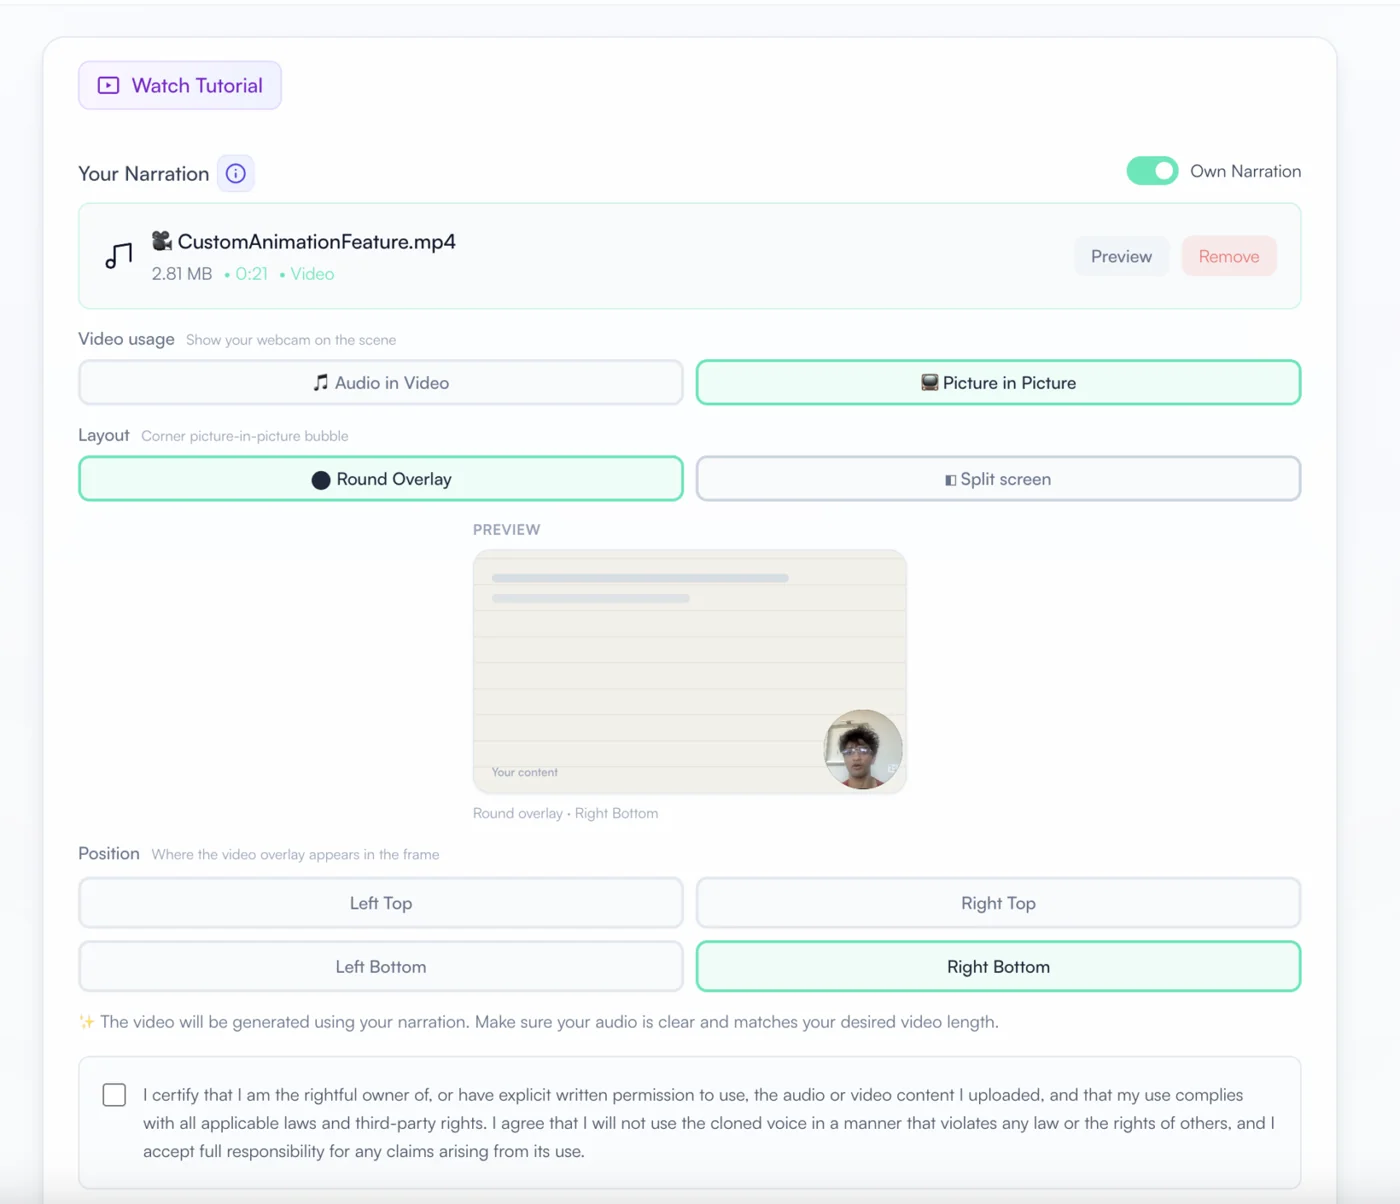
Select Split screen when the presenter should have a dedicated panel. Use it to place the person to the left or right of the content, or above or below it when that arrangement fits the orientation and composition of the video.
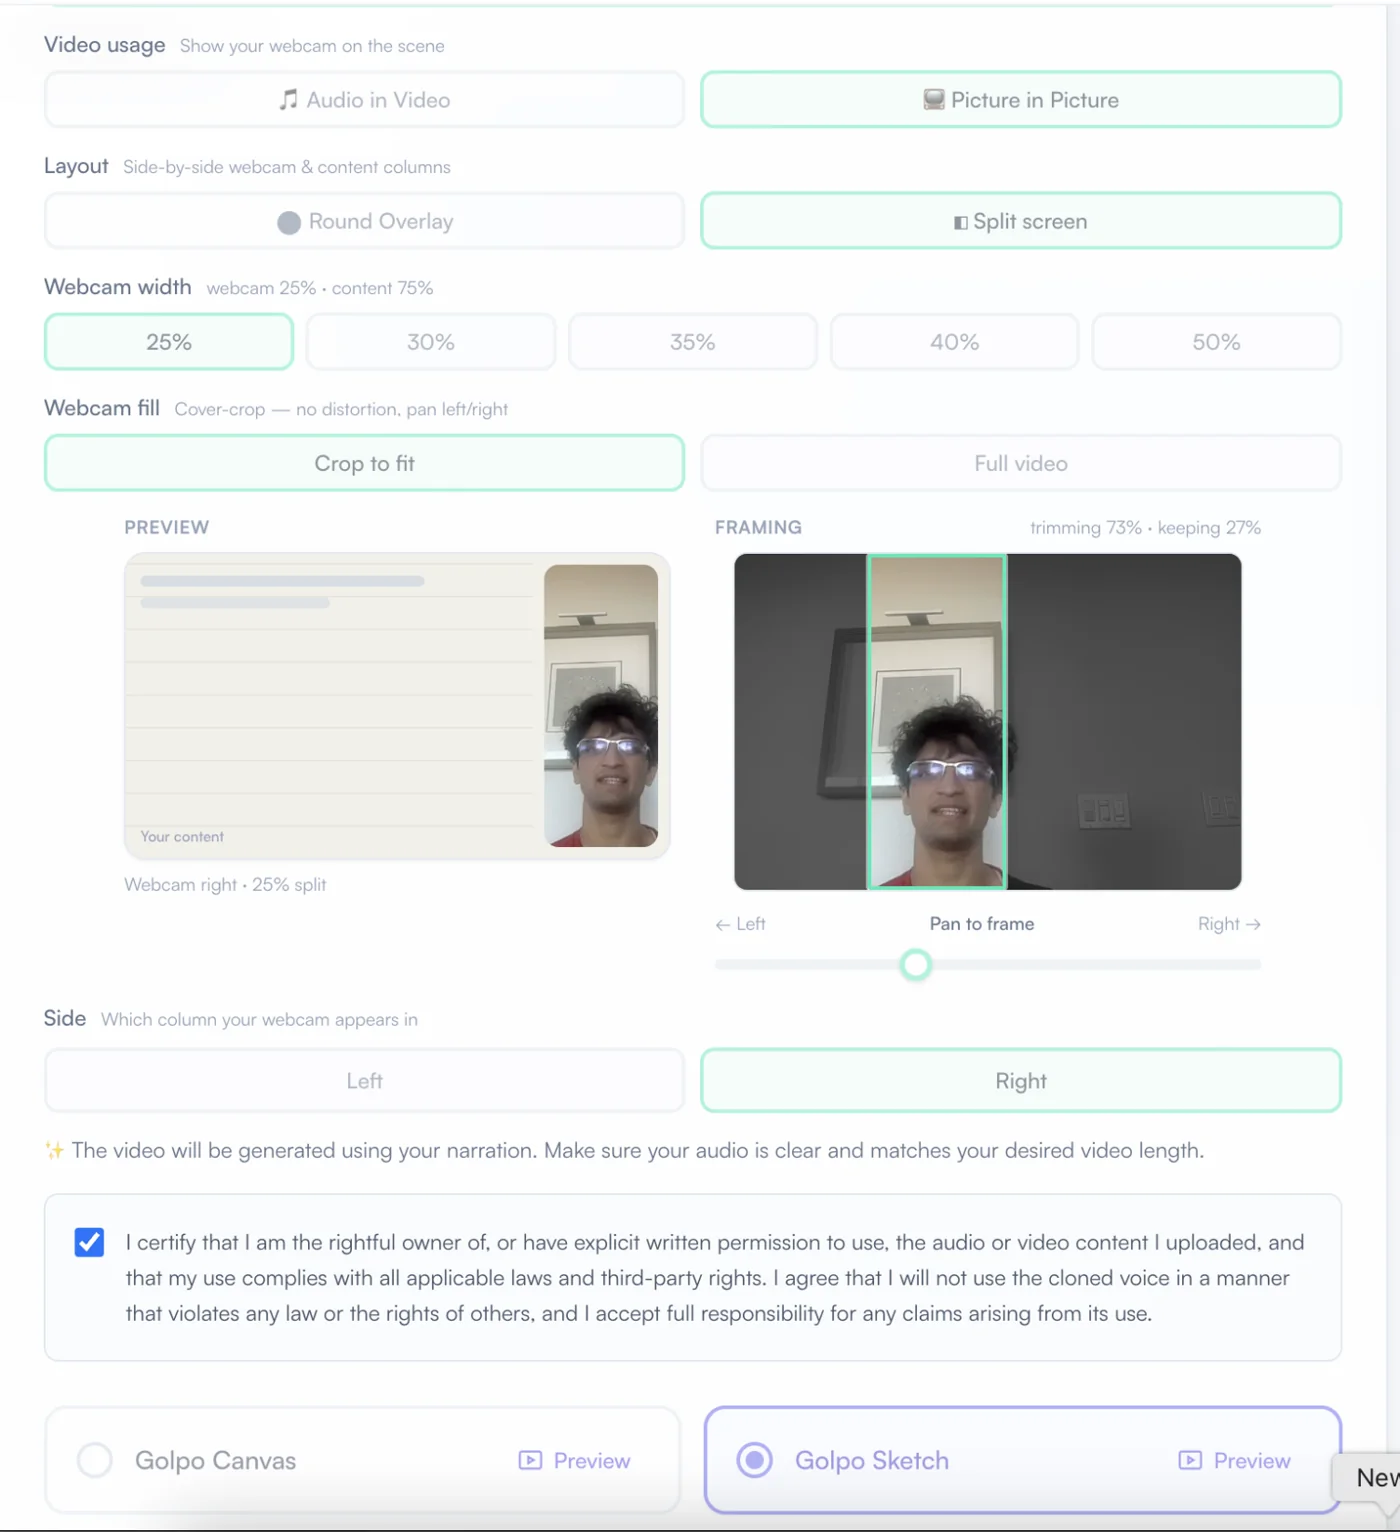
Step 5: Tune the split-screen composition
For split screen, adjust the controls until the preview gives both the presenter and the explanation enough room:
- Webcam width: choose 25%, 30%, 35%, 40%, or 50%.
- Webcam fill: choose Crop to fit for an edge-to-edge panel or Full video to preserve the complete camera frame.
- Framing: pan the crop left or right so the speaker remains centered.
- Side: place the webcam panel on the left or right. For vertical or stacked compositions, use the available top or bottom arrangement.
Step 6: Confirm that you have permission
Check the certification box to confirm that you own the recording or have explicit permission to use its video and audio. This applies whether you recorded yourself, recorded another person, or uploaded an existing file.
Step 7: Choose the animation engine and generate
Select Golpo Canvas or Golpo Sketch, finish the remaining style, language, pacing, and orientation settings, and generate the video. Golpo uses the narration for timing, creates the explanatory scenes, and composites the presenter in the layout you selected.
Which Picture-in-Picture layout should you choose?
| Layout | Best for | What to watch |
|---|---|---|
| Round corner overlay | Tutorials, reactions, personal introductions, and videos where the animation needs most of the frame | Keep important labels and diagrams away from the chosen corner |
| Left split | Presenter-led lessons, announcements, and direct-to-camera messages | A wider panel increases presence but reduces animation space |
| Right split | Explainers that read naturally from visual content on the left to the speaker on the right | Check that the crop keeps the speaker's face centered |
| Presenter on top | Portrait lessons, social videos, and executive introductions | Leave enough height below for diagrams and scene details |
| Presenter on bottom | Videos where the animated explanation deserves the strongest visual position | Avoid captions or controls competing with the lower presenter panel |
A practical rule: use a round overlay when the presenter's face adds warmth and trust, and use split screen when the presenter's gestures, expression, or direct address carry substantial meaning.
Where Picture in Picture is useful
YouTubers and creators
Explain a product, break down a news story, teach a technique, react to a concept, or turn a simple talking-head recording into a more visual episode. The presenter keeps the channel's personality while Golpo adds diagrams and scene changes.
Teachers and course creators
Record a lesson, worked example, revision session, or course introduction. Students can see the teacher while the concepts appear as drawings, timelines, examples, and supporting scenes.
CEOs and company leaders
Deliver a company-wide announcement, quarterly update, strategic narrative, culture message, or change-management communication. The leader stays visible while the animation clarifies priorities, milestones, and decisions.
CFOs and finance teams
Present financial results to a board, regulator, authority, investor group, or internal leadership team. The speaker can introduce the numbers while Golpo visualizes trends, drivers, risks, and next steps.
Marketers and growth teams
Send personalized outreach with a human introduction and a tailored explainer beside it. Use the same approach for campaign recaps, customer stories, event invitations, launch announcements, and account-based marketing.
Sales teams
Record a personal opening for a proposal, product walkthrough, or follow-up. The seller remains on camera while the explanation highlights the buyer's problem, the proposed solution, and the call to action.
Product managers and founders
Walk through a product decision, roadmap, launch, or feature concept. Use the animation to explain the system while the presenter supplies context and conviction.
Learning and development teams
Turn a trainer's recording into onboarding, compliance, process, or skills content. The trainer keeps a human presence while the scenes make steps and policies easier to follow.
Consultants, coaches, and experts
Deliver frameworks, assessments, recommendations, and personalized advice with a more engaging visual layer than a webcam recording alone.
Customer success and support
Create welcome messages, implementation guidance, troubleshooting walkthroughs, and renewal reviews. A recognizable person can build trust while Golpo handles the explanation.
Best practices for a polished result
- Prioritize clear audio. The narration drives the timing, so use a quiet room and keep the microphone close.
- Frame for the layout. Leave headroom and avoid sitting too close to an edge. Split-screen crops need room to pan.
- Look toward the content. If you know the presenter will sit on the left, a slight eye-line toward the right can make the composition feel intentional.
- Use even front lighting. A clearly lit face stays readable in both narrow panels and small round overlays.
- Choose the smallest useful presenter size. Start around 25% to 35% for split screen, then increase only when facial expression or gestures need more emphasis.
- Preview the crop. Use the framing control to keep eyes and face centered before generation.
- Protect important visual areas. Do not place a round overlay over a corner that needs labels, equations, or diagrams.
- Match the orientation to the destination. Use portrait for vertical feeds and landscape for presentations, YouTube, courses, and company communication.
- Keep the delivery natural. Speak in complete thoughts, pause between major ideas, and avoid rushing through transitions.
- Use only authorized recordings. Record yourself or use video and audio for which you have explicit rights and consent.
Related Golpo feature guides
- How to use Own Narration: upload audio, upload video, or record live
- Introducing Golpo Own Narration and webcam recording
- How to create a Custom Style in Golpo Canvas
- How to control the finished video with Video Instructions
- Golpo plans and pricing explained
Ready to put yourself inside the explanation?
Open Golpo, turn on Own Narration, record or upload your presenter video, and choose Picture in Picture.
Tags


