How to Connect Golpo to Grok with MCP: A Step-by-Step Guide
Connect Golpo to Grok with annotated MCP setup screenshots, a narrated video walkthrough, and prompts for your first explainer video.

Connect Golpo to Grok, then create explainer videos from a conversation. This guide shows the actual setup: open the Grok instructions on Golpo’s MCP page, create a custom connector, authorize the connection, and try your first prompt. Each screenshot includes numbered red markers and arrows identifying the fields and buttons to use.
Watch the annotated video walkthrough
This narrated walkthrough was created with the Golpo API using the seven annotated screenshots below. Open the video in a separate tab if you want to follow along beside Grok.
The connection flow at a glance
- 01Open MCPGolpo homepage
- 02Add GolpoGrok Connectors
- 03Sign inOAuth + Google
- 04Create a videoA new conversation
Keep this MCP server URL ready:
https://mcp.golpoai.com/mcp
MCP stands for Model Context Protocol. It gives Grok a way to use Golpo’s connected tools for creating videos, checking progress, and retrieving share links.
Before you start
Sign in to Grok and have your Golpo account ready. You will authorize Grok to connect to that Golpo account during setup.
This guide follows the custom-connector flow shown in Golpo’s recording and Grok’s connector documentation. If you use a managed Business or Enterprise workspace, your team administrator may need to provision the connector before you can connect your own account.
Step 1: Open MCP on Golpo and choose Grok
Go to the Golpo homepage. Follow the markers in order:
- Click MCP in the top menu, between API and Guides.
- Select the Grok tab.
- Click How to connect? to open the Grok setup instructions.
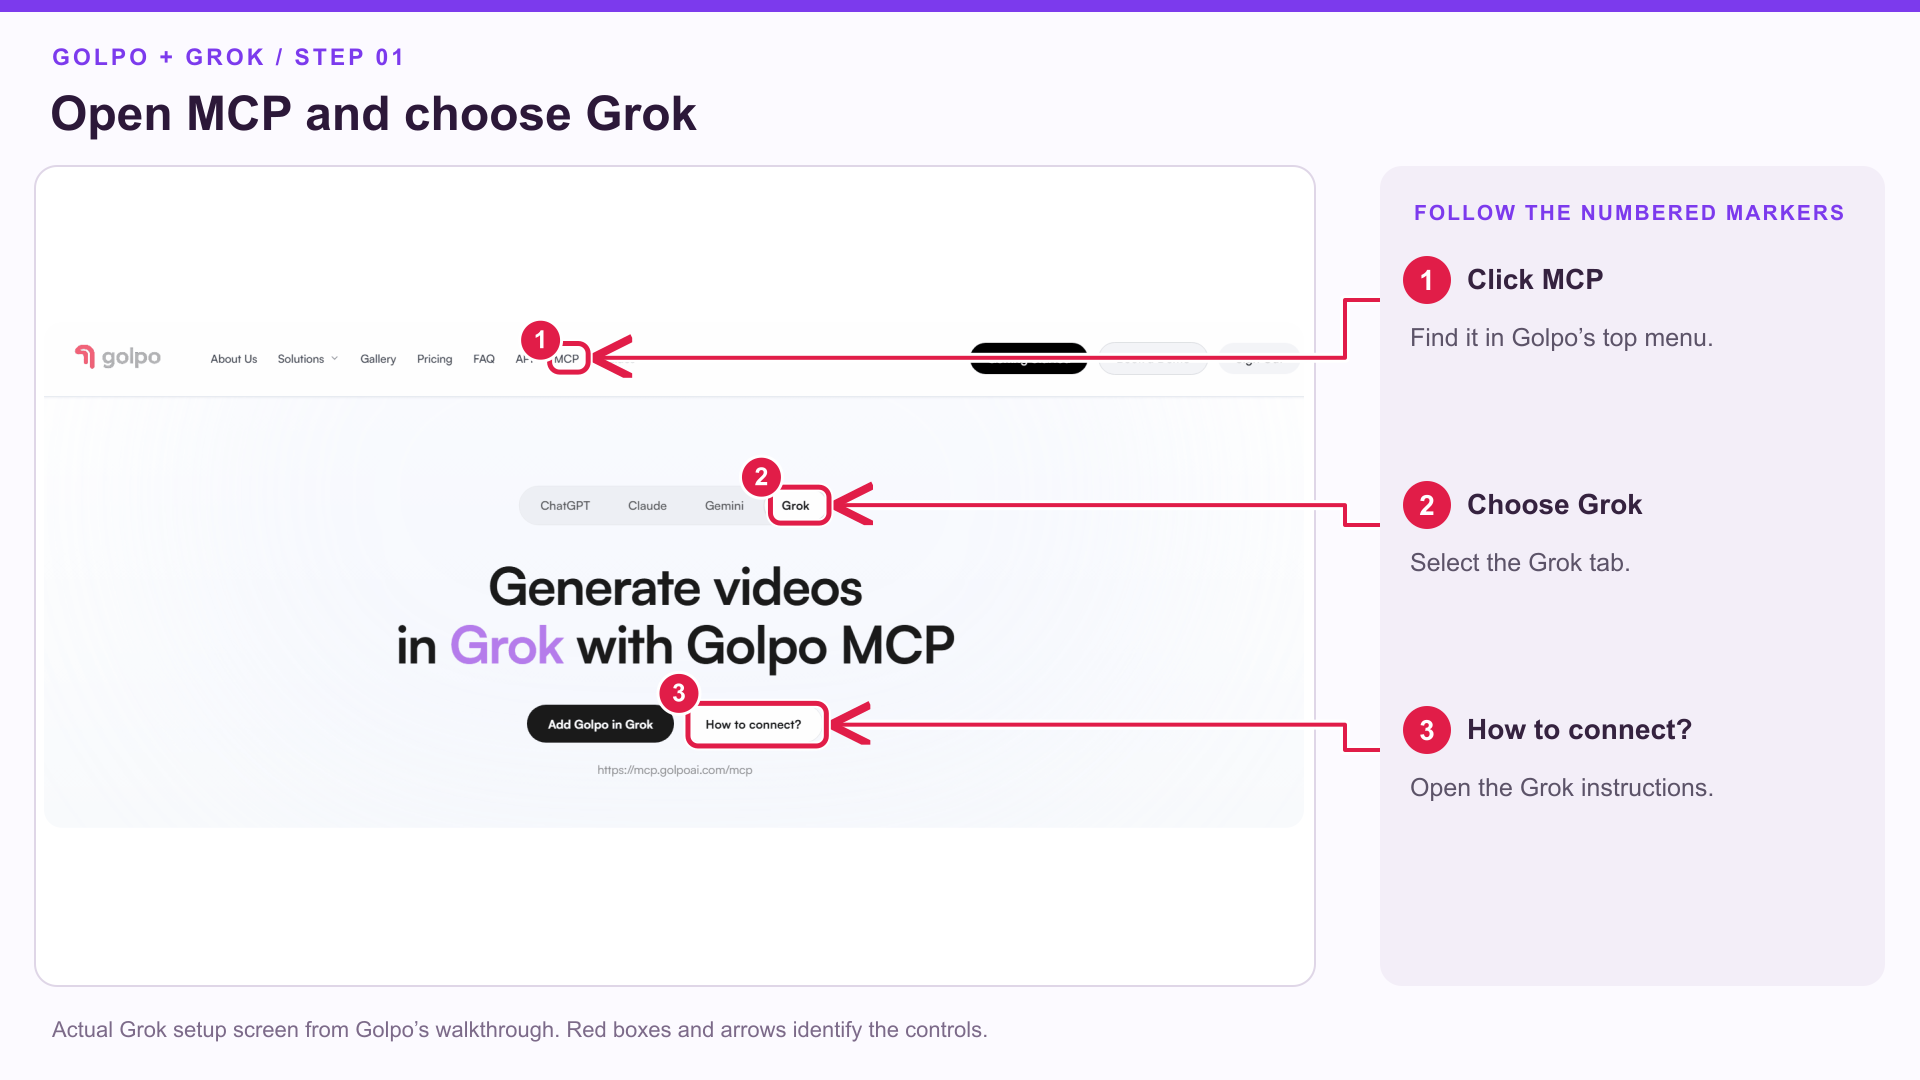
You can reach the same page directly at Golpo MCP. With Grok selected, Add Golpo in Grok opens Grok’s connector page.
Step 2: Open New Connector in Grok
Go to grok.com/connectors and sign in if needed.
Click New Connector in the upper-right area. The screenshot marks this exact button.
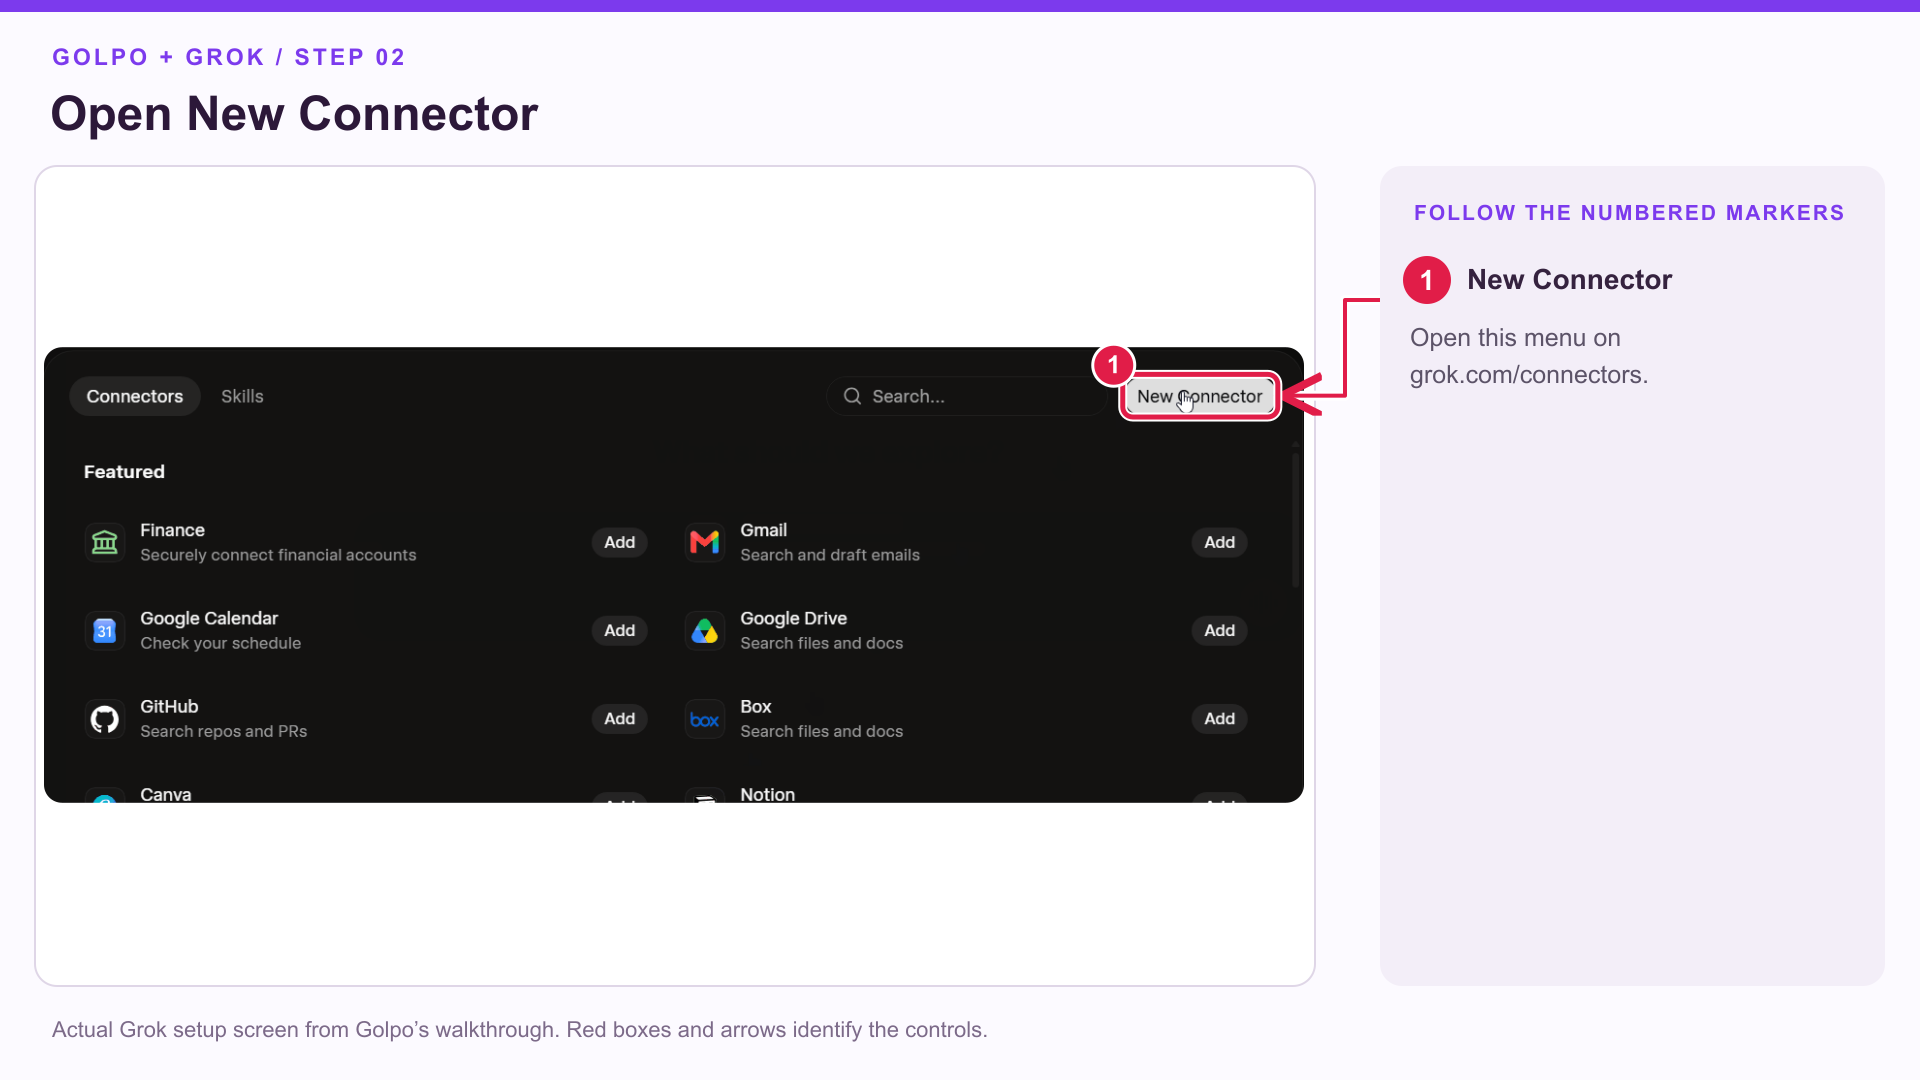
This opens the connector-selection menu.
Step 3: Choose Custom
Select Custom, near the top of the menu. It is the option for adding your own MCP connector.
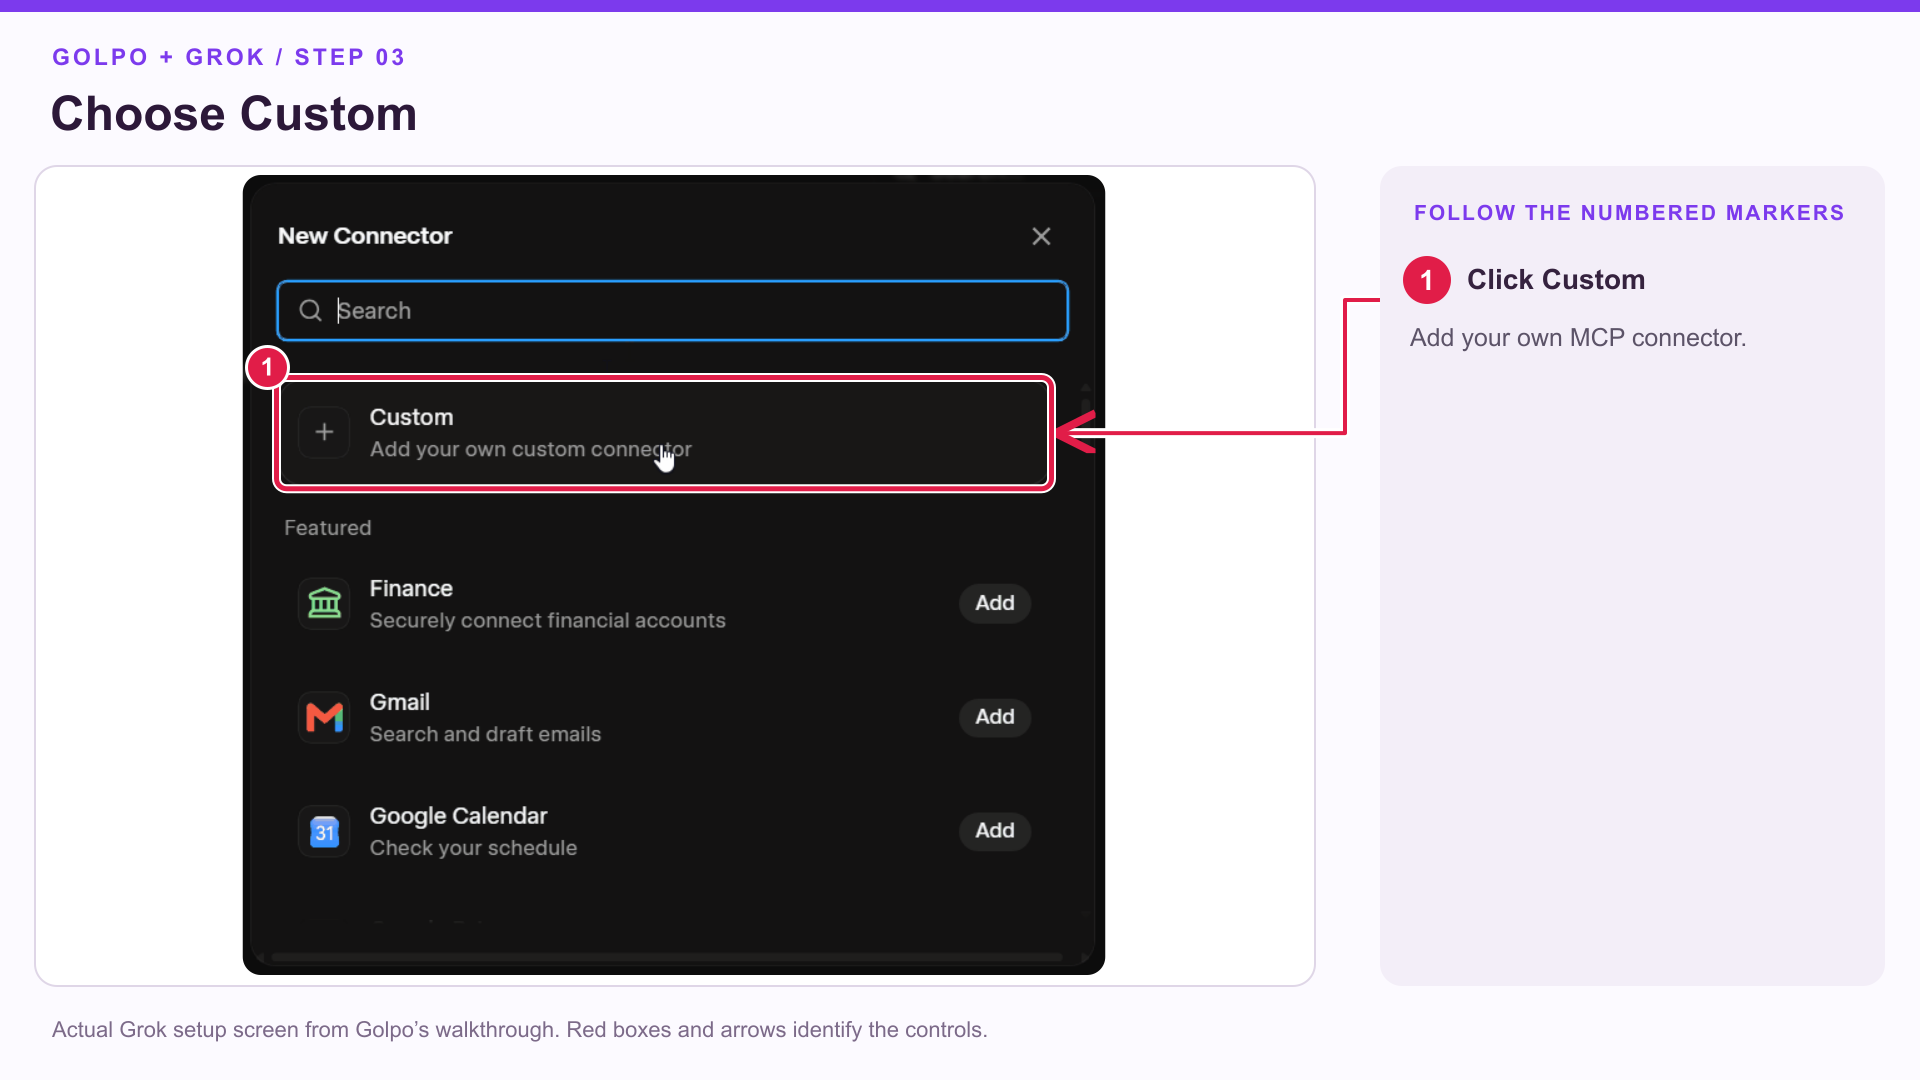
The Custom Connector form asks for a name and a server URL.
Step 4: Enter Golpo’s name and server address
Follow the three numbered controls:
- In Name, enter Golpo.
- In Server URL, paste
https://mcp.golpoai.com/mcp. - Click Add Connector.
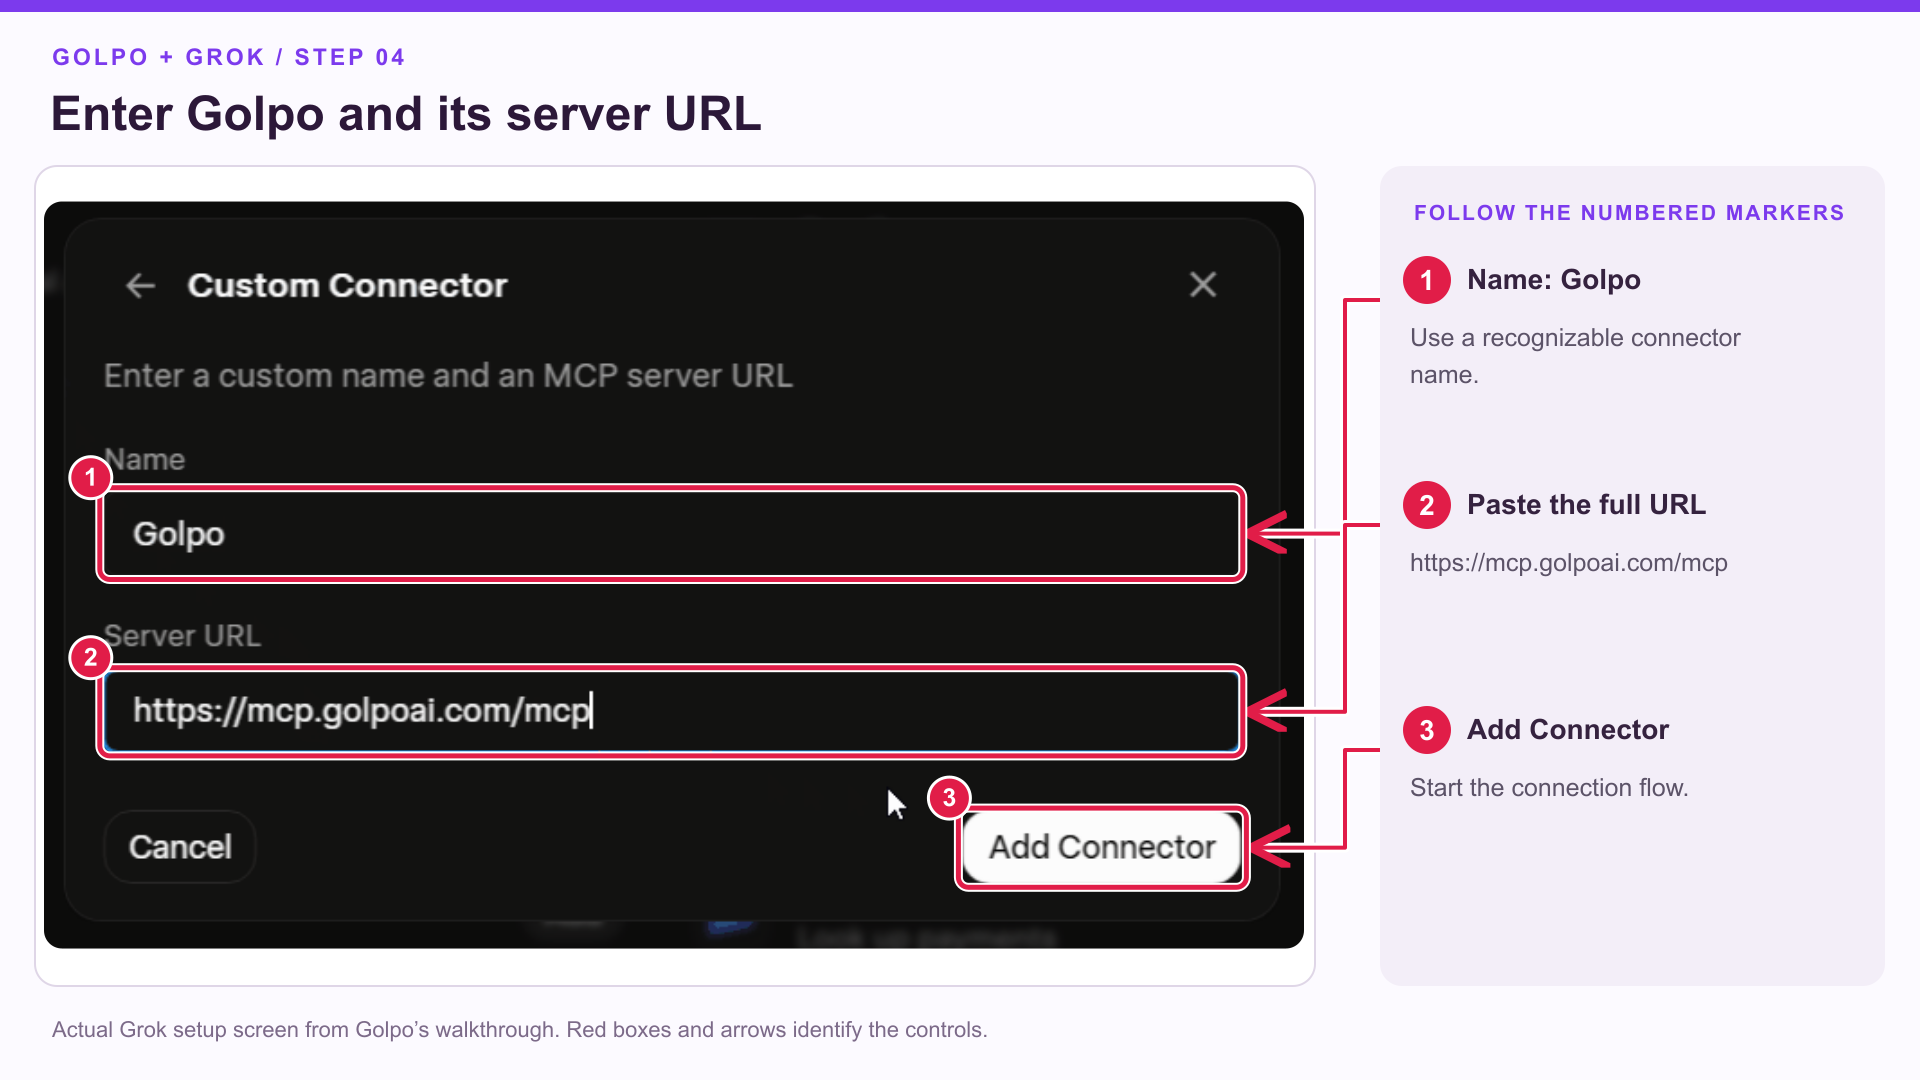
Keep the full address, including the final /mcp. The URL of the setup page, https://video.golpoai.com/mcp, is different from the MCP server address entered in this form.
The screenshot shows the completed fields and the enabled Add Connector button. The name is the label you will recognize later in Grok.
Step 5: Sign in to Golpo and allow the connection
Complete Google sign-in using the account you use for Golpo if the sign-in flow appears.
Review the Connect Golpo to Grok? screen. When you are ready to connect the accounts, click Allow, highlighted below.
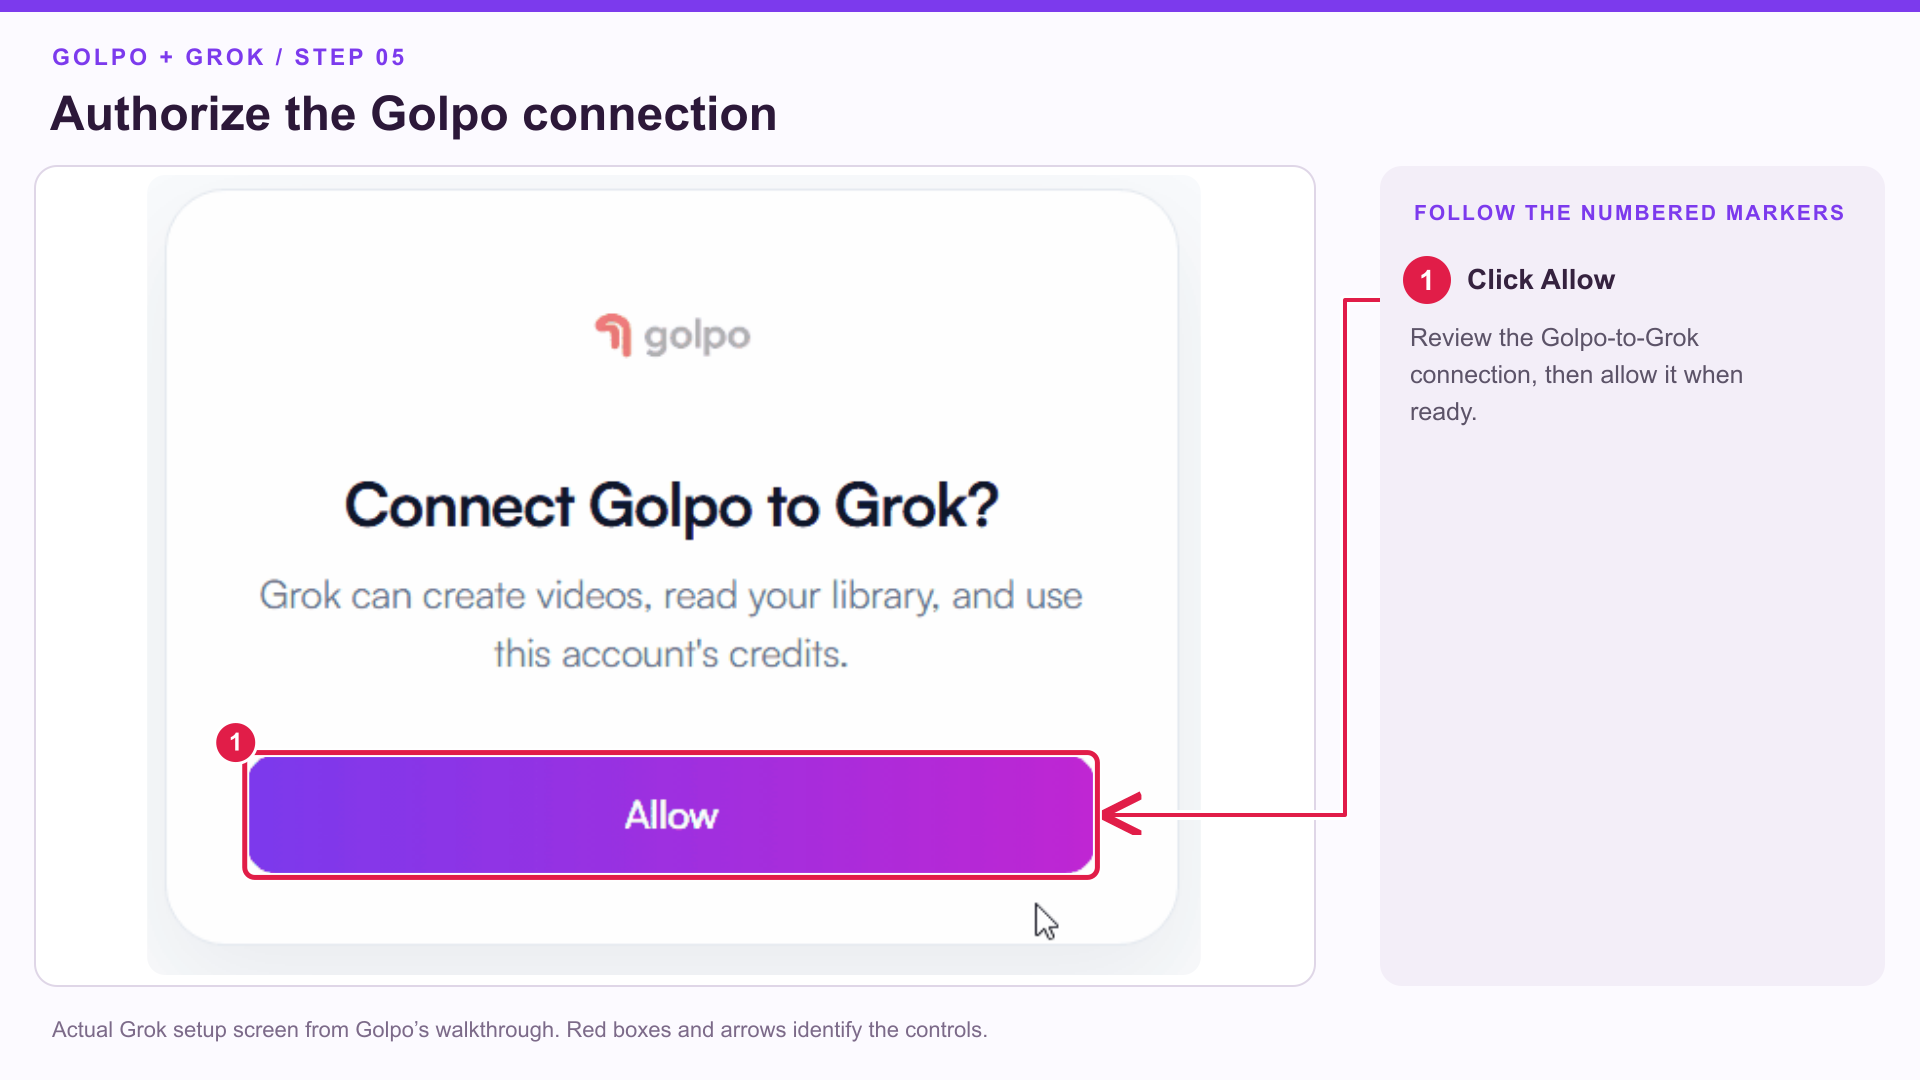
The authorization screen explains the actions the connection can take. After approval, return to Grok’s connector page.
Step 6: Check that Golpo is connected
Open the Golpo connector’s details. The recorded setup now shows Golpo, the server address, and the available tools.
The red box highlights the tool list, which includes video generation, uploads, video retrieval, progress checks, and connector status.
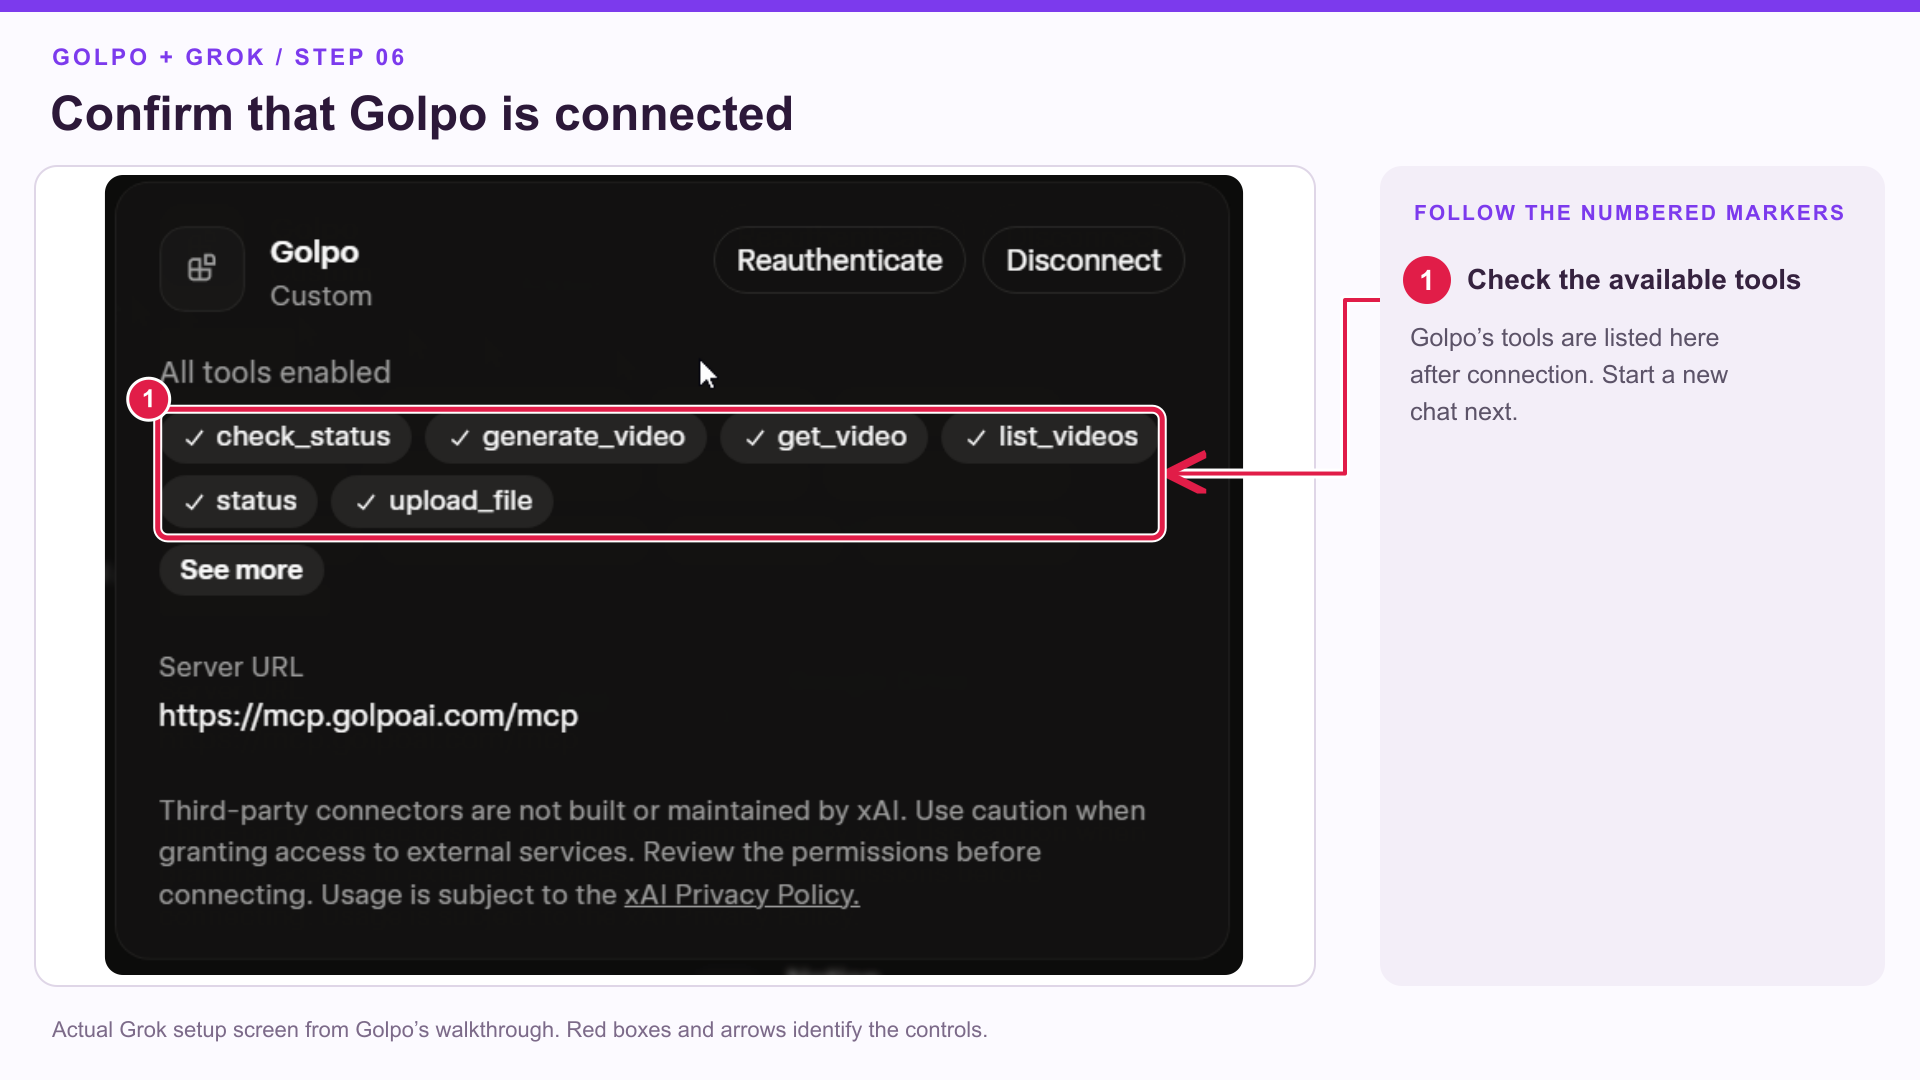
Once the connection is ready, start a new Grok conversation.
Step 7: Ask Grok to use Golpo
In a new chat, select Golpo through the connector controls if your layout asks you to choose a connector, or explicitly begin your request with Use Golpo.
The recorded example shows Golpo selected in the composer. Marker 1 indicates where to write your request; marker 2 points to the send arrow.
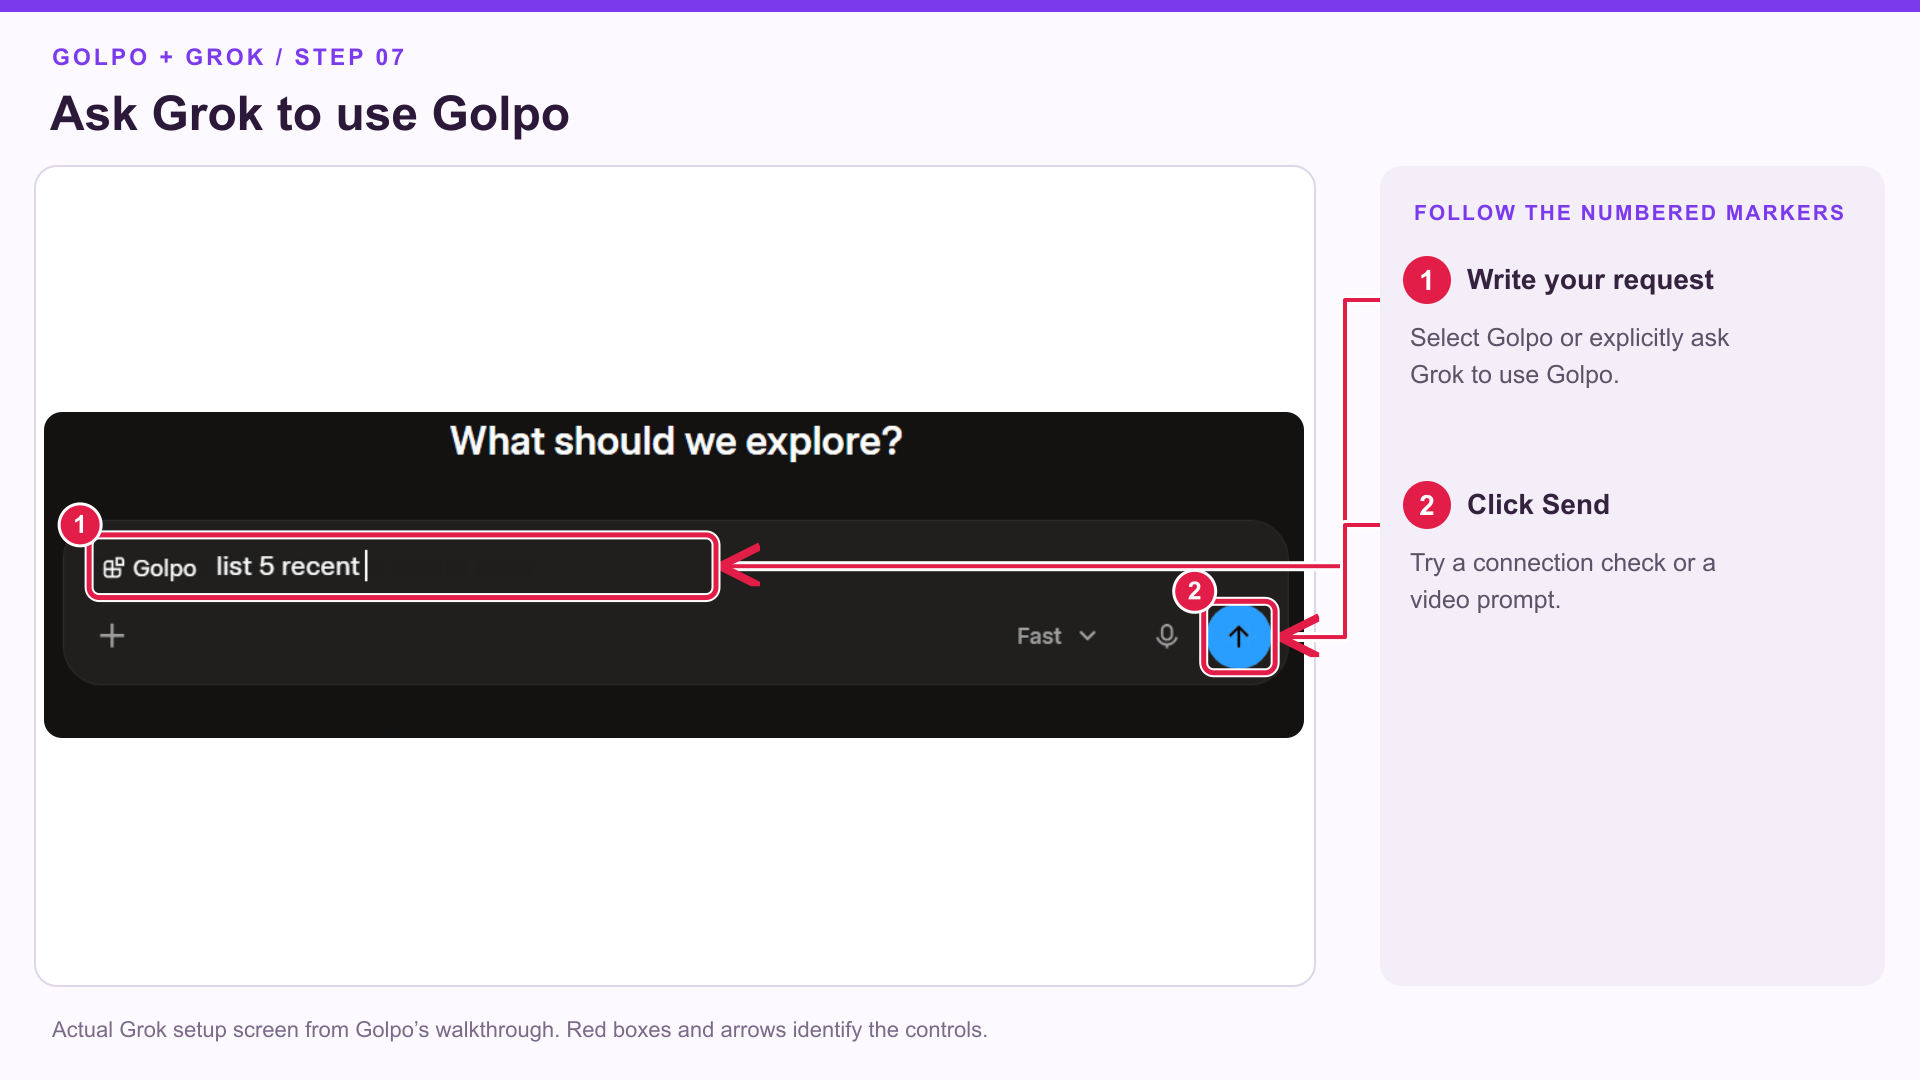
Start with a connection check:
Use Golpo to check whether I am signed in and the connector is ready.
Or try a read-only request:
Use Golpo to show my five most recent videos, including their titles and share links.
When the connection is working, try this video prompt:
Use Golpo to create a 10-minute explainer video about how rainbows form.
Use a friendly whiteboard style, English narration, and a female voice.
Explain it for a curious 10-year-old, with simple visual examples.
Choose a duration supported by your Golpo account. A shorter length also works for your first test.
Review any action confirmation Grok presents before generation begins. After the video starts processing, ask:
Check the status of the Golpo video we just created.
If it is complete, give me its share link.
Open the returned share link to review the finished video. If it is still generating, check the existing video again later.
What can Grok do with Golpo after connecting?
Golpo’s MCP connection exposes six tools. You can request them in ordinary language:
| What you want | Example request |
|---|---|
| Create a video | “Use Golpo to create a one-minute introduction to our product.” |
| Upload a file | “Upload my logo from this public HTTPS link to Golpo for use in a video.” |
| Find recent videos | “List my latest five Golpo videos and their share links.” |
| Retrieve a video | “Get this Golpo video by its ID and include its script if available.” |
| Check progress | “Is the Golpo video we just started complete?” |
| Check sign-in | “Check whether the Golpo connector is signed in.” |
See the current tools on Golpo’s MCP page. For a first project, describe one video clearly, review the result, and decide what to make next.
Troubleshooting the connection
I cannot find New Connector
Open Grok’s connector page directly. In a managed workspace, ask your administrator whether the connector needs to be provisioned for your team.
I cannot find Golpo in the connector catalog
Use New Connector → Custom and enter Golpo’s server URL, as shown in Steps 2–4. The custom form lets you add the Golpo MCP server directly.
The form will not continue
Check that Name contains a label such as Golpo, and Server URL contains the complete https://mcp.golpoai.com/mcp address. Then click Add Connector.
I closed the sign-in window before authorizing Golpo
Return to the Golpo connector in Grok and complete its connection or sign-in flow. Review the authorization screen and use Allow when you are ready to connect.
Golpo is connected but Grok does not use it
Start a new conversation and explicitly ask Grok to use Golpo. Select Golpo in the composer if your interface offers connector selection, then run the connection-check prompt from Step 7.
The video has not finished
Ask Grok to check the same video’s status. Request its share link when Golpo reports completion.
Frequently asked questions
What is the Golpo MCP server URL for Grok?
Use https://mcp.golpoai.com/mcp in the Custom Connector form’s Server URL field.
What name should I enter?
Use Golpo, as shown in the recorded setup. The name helps you recognize the connector in Grok.
Which connector option should I choose?
Choose Custom from the New Connector menu, then enter Golpo’s MCP server address.
Do I need to write code for this setup?
The illustrated flow uses Grok’s custom-connector form and an account sign-in screen. No code is needed for these steps.
Can I create videos and get their links in Grok?
Yes. Golpo’s tools support generation, status checks, and retrieving video share links. Ask for the link when your video is complete.
Are there guides for the other assistants?
Yes. Follow the guides for ChatGPT, Claude, and Gemini.
Walkthrough script and video settings
View the exact narration and video settings
Script
Here is how to connect Golpo to Grok using a custom MCP connector. The numbered red markers show the exact fields and buttons to use.
Start on the Golpo homepage and click MCP in the top menu. Select Grok, then click How to connect for the instructions. Click Add Golpo in Grok, or open the Grok connectors page and sign in.
On the connectors page, click New Connector, highlighted in the upper right.
Choose Custom from the menu. This opens the form for your own MCP connector.
Set the name to Golpo. Paste the complete Golpo MCP server address shown in the second highlighted field. Keep the final slash mcp. Then click Add Connector, marked with the third arrow.
Complete the Google sign-in flow for your Golpo account if it appears. Review the Connect Golpo to Grok authorization screen. When you are ready to connect the accounts, click Allow.
Return to the connector page. The recorded example now shows Golpo and its available tools. This is the confirmation screen to check before starting a new conversation.
In a new Grok chat, select Golpo in the composer or explicitly ask Grok to use Golpo. Write your request and click the send arrow marked on screen.
Start with a connection check: ask whether the Golpo connector is signed in. You can also ask for your five most recent Golpo videos and their share links.
For a video, try: Use Golpo to create a ten-minute explainer about how rainbows form, with a friendly whiteboard style and English narration. Choose a duration supported by your Golpo account.
Review any action confirmation before generation begins. After it starts, ask Grok to check that video's status. Once generation is complete, request the share link and open the video to review it.
That is the full flow: open MCP on Golpo, add a custom connector in Grok, authorize it, then create videos from a new chat.
Video settings
Created with the Golpo API using English narration, voice solo-female-3, Golpo Canvas Sharpie, Normal pacing, and seven distinct annotated screenshots inserted as static images. The requested duration was Auto; the finished length is 2 min 06 sec.
{
  "timing": "auto",
  "video_type": "long",
  "language": "en",
  "style": "solo-female-3",
  "use_2_0_style": true,
  "image_style": "marker",
  "pacing": "normal",
  "script_only_text": true,
  "use_as_is": [
    true,
    true,
    true,
    true,
    true,
    true,
    true
  ],
  "skip_animation": [
    true,
    true,
    true,
    true,
    true,
    true,
    true
  ]
}
Keep going with Golpo
- Golpo’s complete tutorial: Explore the creation workflow in more detail.
- Prompt Mode vs. Script Mode: Choose between an idea and exact narration.
- Video Instructions: Learn how to describe your desired visuals.
- The Golpo MCP server guide: Explore the broader integration workflow.
The underlying screens come from the Grok walkthrough on Golpo’s MCP page. Numbered control boxes, arrows, and instruction panels were added to show where to click. Grok’s connector documentation describes the custom MCP connection flow.
Tags


